What Size Solder for Stained Glass: A Practical Guide
Learn the optimal solder sizes for stained glass projects, covering copper foil and lead came techniques, recommended diameters, and practical tips for clean, durable joints in 2026.

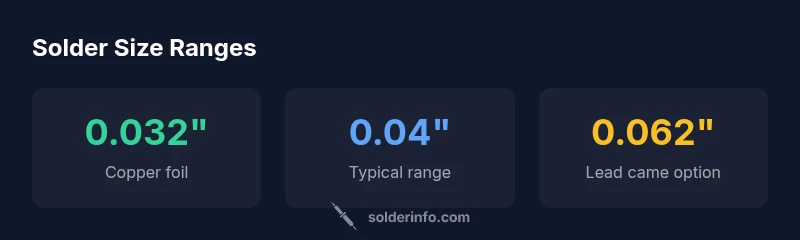
For stained glass work, use solder around 0.032 to 0.062 inches in diameter. Copper foil methods typically use 0.032–0.04 inch solder (about 0.8–1.0 mm), while lead came joints may benefit from thicker solder in the 0.062 inch range. Start with 0.032 inch for detailed curves and adjust to 0.04–0.062 inch for sturdier joins.
Why Solder Size Matters for Stained Glass
According to SolderInfo, the size of the solder you choose affects heat transfer, bead formation, and joint durability in stained glass. When you’re joining copper foil or lead came, the diameter influences how the iron's heat is distributed across the joint and how much solder is deposited in a single pass. A bead that’s too small can leave gaps and weak joints; a bead that’s too large can obscure foil edges and create an uneven surface. For stained glass, you’ll typically work within a few standard sizes, such as 0.032–0.04 inch for copper foil, or up to 0.062 inch for more substantial lead came joints. Remember that heat dissipation and flux choice matter as much as wire size, and you should practice on scraps to tune your technique.
What size solder for stained glass: Copper foil method
In the copper foil technique, the solder diameter you pick should balance control with deposition rate. A 0.032–0.04 inch wire provides fine control for curves and tight joints, helping you follow the foil edge cleanly. Use rosin-core solder with a flux that suits your glass type and ensure your iron temperature is consistent. If joints start to appear wobbly or gaps form, try a slightly larger size within the range or slow your hand to allow a smoother bead. Practice on test panels to calibrate your setup and avoid overheating delicate glass.
Lead Came Method: Adjusting Solder Thickness for Joints
Lead came joints are bulkier and can tolerate thicker solder, up to about 0.062 inch in diameter. The heavier wire fills gaps more readily and adds mechanical strength where came channels are wider. However, heat management is crucial; apply heat evenly and avoid lingering on one spot to prevent glass stress. For larger panels, consider running multiple short passes rather than a single long bead to prevent flow smearing or warping. Always inspect for uniform bead width along the seam.
Practical Guidelines: When to Increase or Decrease Diameter
If a joint is small with a narrow gap, start at 0.032 inch and work in short, controlled passes. For wider joints or thicker glass, move toward 0.04–0.062 inch, but keep the bead tidy by wiping excess solder with a damp sponge and controlling cooling with a comfortable pace. A helpful rule of thumb is to keep the bead slightly narrower than the foil edge, ensuring the next bead fuses cleanly without piling up on the face of the panel.
Techniques for Delicate Curves and Complex Mosaics
Curves and mosaics demand precise solder flow. Use the smallest size within the copper foil range for delicate curves; for tight bends, you may need to reduce heat and apply multiple micro-beads rather than a single thick bead. For highly detailed work, consider laying a fine backbone of 0.032 inch solder and adding smaller fillets as needed to fill gaps. This staged approach minimizes distortion and preserves glass contours.
Tools and Materials: Solder, Flux, and Tips for Consistency
Beyond diameter, your success hinges on consistent heat, clean glass, and good flux. Keep a steady iron temperature and pre-tin your copper foil edges to promote bead adhesion. Use rosin-core solder of the chosen diameter, and keep the work surface clean with a damp sponge. Store solder in a dry environment to prevent oxidation, and check for cold joints by gently tugging the seam.
Common Mistakes and How to Fix Them
Common mistakes include using too large a diameter on delicate curves, creating lumpy beads that obscure foil edges, and overheating the glass. To fix, swap to the lower end of the diameter range, slow your strokes, and reflow the joint with fresh flux. If a joint looks dull or granular, rework it with a clean bead and ensure you’ve removed old flux to avoid residue that can cloud the finish.
Maintenance and Quality Assurance for Repaired Panels
Quality assurance comes from testing joints under light pressure and visually inspecting for uniform bead width. After completing a panel, check that all joints blend with smooth, consistent beads and that there are no visible gaps. Clean joints with flux remover and ensure you store finished panels away from moisture. Regular practice on practice pieces will improve consistency over time.
Solder size guidelines by staining glass technique
| Technique | Typical Solder Diameter | Notes |
|---|---|---|
| Copper foil | 0.032-0.04 inch | Best for precise joints and curves, follow foil edge closely |
| Lead came | 0.062 inch | Bulky joints; more forgiving heat when used correctly |
Quick Answers
What is the most common solder size for copper foil stained glass?
For copper foil, 0.032–0.04 inch diameter solder is standard. This range provides good control on detailed curves while keeping joints neat. Always adjust based on glass thickness and foil width.
For copper foil, use around 0.032 to 0.04 inch solder for best control on curves.
Does using a thicker solder always strengthen joints?
No. Thickness affects heat control and bead appearance. Use appropriate diameter for the joint and technique to avoid over-soldering curves or masking foil edges.
Thicker solder doesn't automatically make joints stronger; choose size for the joint.
Can I use lead-free solder for stained glass?
Yes, lead-free solder is acceptable, but it has a higher melting point and may flow differently. Ensure flux and heat settings suit the alloy you choose.
Lead-free works, but watch melting point and flow.
What should I do if beads feel dull or look lumpy?
Reflow the joint with fresh flux, ensure the iron tip is clean, and apply smaller, even passes to improve shine and consistency.
Reflow with clean flux and even heat.
Is there a recommended diameter for very large leaded panels?
Yes, you can go up to about 0.062 inch for wide seams, but monitor heat to prevent glass stress and warping.
Up to 0.062 inch for large seams.
“Sizing the solder correctly is a blend of art and physics; small diameters offer precision, while larger diameters speed up bulk joints. Practice leads to consistency.”
Top Takeaways
- Start with the smallest diameter in your range.
- Match diameter to joint size and glass thickness.
- Practice on scrap panels first to tune technique.
- Control heat and flux for clean, durable beads.