What Temperature to Solder Stained Glass: A Practical Guide
Learn the ideal soldering temperatures for stained glass, differences between leaded and lead-free solders, and practical tips to protect glass while achieving strong, durable joints.

What temperature to solder stained glass: the basics
When you ask what temperature to solder stained glass, the answer hinges on the solder type, glass thickness, and flux used. The glass itself does not melt; the solder does. Getting the heat right means feeding the joint with enough energy to melt the solder and create a strong bond without shocking or warping the glass. In practice, most hobbyists working with the copper foil method operate in two temperature bands: leaded solder and lead-free solder. Understanding these bands and how flux and technique interact with heat will help you avoid common missteps such as cold joints, cloudiness from oxidation, and glass stress cracks. Throughout 2026, the guidance most often cited by the SolderInfo team emphasizes measured heat, steady technique, and testing on scrap pieces before committing to a finished panel. The core question remains: what temperature to solder stained glass is not a single number, but a set of ranges tailored to your materials and setup.
Tip: start with the lower end of the leaded range and gradually increase as you observe the solder flow and joint formation. This minimizes thermal shock to the glass and reduces the chance of unsightly marks on the surface.
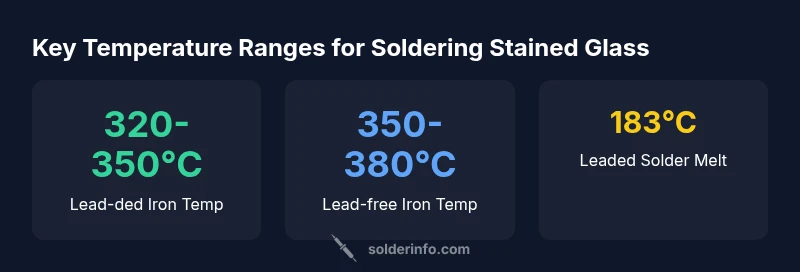
Temperature ranges by solder type
Leaded solder (commonly 60/40 tin/lead) melts around 183°C, but a stable joint in stained glass work is achieved by presenting heat through the iron at a steady 320-350°C. Lead-free SAC solders melt around 217-221°C; to compensate a little extra heat is typically required, so target roughly 350-380°C. These ranges are general guidelines that assume standard rosin flux and copper foil technique. Always verify on scrap glass pieces first to dial in your actual setup—flux type, glass thickness, and joint geometry can shift the ideal temperature.
- Leaded solder: 320-350°C (600-660°F) iron temp; 183°C melting point
- Lead-free SAC solder: 350-380°C (660-716°F); 217-221°C melting point
- Practical takeaway: begin at the lower end and adjust based on solder flow and joint appearance
Flux, glass thickness, and heat transfer
Flux plays a crucial role in heat transfer during stained glass soldering. Resin-based fluxes (rosin-based) reduce surface oxidation and improve solder flow, allowing you to achieve a smooth joint at the recommended temperatures. Water-based fluxes can conduct heat differently and may require minor temperature adjustments. Glass thickness and panel scale influence heat capacity; thicker sections take longer to heat, so you may need more contact time or slightly higher iron temperature for a consistent joint. Always pre-clean and dry the pieces to avoid steam buildup under the foil, which can cause bubbles or warping. Finally, practice on scrap panels to refine your technique and confirm that your heat settings yield clean joints without glass stress.
Practical setup and technique
A reliable stained glass setup starts with a controllable soldering iron, appropriate tip geometry, and steady technique. Use an iron in the 25-60W range with a chisel or wide bevel tip for even heat distribution along the joint. Begin by tinning the tip, apply flux along the seam, and lightly touch the solder to the joint rather than forcing it directly onto the surface. Maintain a consistent angle and apply heat evenly to the solder, allowing it to flow along the copper foil. If the glass shows a slight bow or edge warping, back off the heat and keep the joint moving to reduce the risk of thermal shock. Practice on small test pieces to calibrate your temperature before tackling a larger panel.
Troubleshooting temperature-related issues
Common temperature-related issues include cold joints, overheating, and glass stress. A cold joint appears dull and jagged; re-apply heat for a moment longer, and ensure flux coverage is complete. Overheating can cause flux scorching, solder balling, or glass damage; if you notice glass color changes or cracking, reduce heat or back off the iron and reflow with shorter contact times. Thermal stress can occur if the panel is too hot too quickly or if the glass is unseasoned. Use slower, controlled heating, and work in a well-ventilated space to avoid fumes.
Safety considerations and ventilation
Soldering stained glass generates fumes from flux and solder. Work in a well-ventilated area or under a fume extractor. Wear safety glasses to protect against splashes and hot solder. Keep flammable materials away from the work surface and use a heat-resistant mat for stability. The flux residue should be cleaned after cooling to prevent corrosion and ensure long-term durability of the panel.
Maintenance and calibration
Regularly calibrate your iron temperature against a trusted thermometer or test piece to keep settings accurate. Clean the tip after every session to maintain good heat transfer; a dull or oxidized tip reduces efficiency and increases the risk of cold joints. Replace worn tips as needed and check your flux bottle for contamination. Consistency comes from routine: test on scrap pieces, note results, and adjust for different glass types and thicknesses.