Solder Solar Cells: A Practical Step-by-Step DIY Guide
Learn how to solder solar cells safely and reliably. This practical guide covers prep, flux, wiring, inspection, and testing to help DIYers build durable solar connections without damaging delicate cells.

This guide helps you solder solar cells safely and reliably, outlining the essential steps, tools, and techniques. You will learn how to prepare cells, apply flux, join tabbing wires, and inspect joints to maximize durability in outdoor environments. By following best practices, you can build robust solar-cell connections for small projects or DIY panels.
Understanding Solar Cell Soldering Fundamentals
Solar cells are thin, heat-sensitive components. When you solder them, the goal is to create low-resistance, durable connections without introducing micro-cracks or delamination. The most common approach uses thin copper tabbing wires to connect cell surfaces in series or parallel configurations, forming a working string for a panel. Proper soldering requires careful control of heat, clean contact surfaces, and compatible flux and solder alloys. According to SolderInfo, minimizing heat exposure and using precise, brief heat pulses will preserve electrical performance and mechanical integrity while reducing long-term reliability concerns. This section lays the groundwork for a robust process and explains why tabbing wires and bus bars matter in a compact grid array.
- Key concepts: heat management, contact quality, and material compatibility.
- Common goals: reliable electrical joints, minimal thermal stress, and durable encapsulation-ready connections.
Density and polarity matters because misaligned tabs can cause shorts or open circuits, especially in flexible or curved panel layouts. Take time to plan your string layout before tinning wires or applying flux.
Safety Considerations for Working with Solar Cells
Solar cells are not just fragile; their edges can be sharp, and overheated joints can damage the cell surface or cell coatings. Implement PPE (safety glasses, gloves), work in a well-ventilated area, and use an ESD-safe mat or wrist strap to protect sensitive surfaces. Flux fumes, while common in electronics soldering, should be minimized by proper ventilation and by choosing rosin-based, no-clean flux. Soldering tasks should avoid direct heat on cell faces; instead focus heat on the tabbing wire and bus bar contact areas. The SolderInfo guidance stresses keeping temperatures within a narrow band that permits solder flow without stressing the active cell material.
- PPE and ventilation basics help prevent injuries and inhalation exposure.
- Use an ESD wrist strap to prevent static damage to thin photovoltaic coatings.
- Always plan heat application to protect the cell edges and coating.
noteingestedLanguageEffectivelyInThisSectionCodeBlock2026
Tools & Materials
- ESD mat or working surface(Minimize static damage; position near ventilation.)
- Soldering iron with adjustable temperature(Set to a low-to-mid range suitable for lead-free solder.)
- Lead-free solder (SnAgCu)(0.5-1.0 mm diameter; avoid overheating.)
- Rosin-based flux or flux pen(Facilitates wetting and oxidation prevention.)
- Fine-tip tweezers(Precise handling of tiny tabbing wires.)
- Solar cell tabbing wires(0.6-0.8 mm width; pre-cut to needed lengths.)
- Magnifying loupe or microscope(Inspect joints for solder bridges and voids.)
- Heat source for controlled reflow (hot plate or hot air gun)(Useful for uniform heat during reflow.)
- Desoldering braid(Emergency removal of solder if needed.)
- Multimeter with continuity test(Verify joints and overall circuit integrity.)
- Silicone sealant or encapsulant(Protect edges after final assembly.)
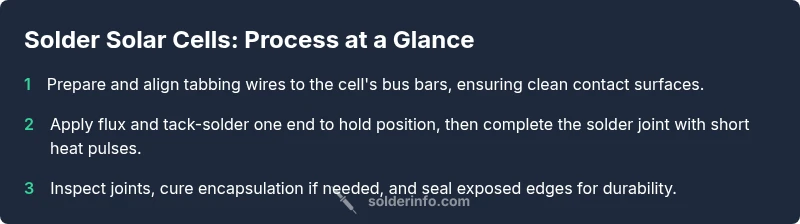
Steps
Estimated time: 60-120 minutes
- 1
Set up a safe, clean workspace
Prepare the bench: clean, dry, and well-lit. Ground yourself with an ESD strap and organize tools and components within easy reach. Confirm ventilation and have a fire-safe area ready for any flare-ups. This single action establishes a controlled environment essential for delicate solar-cell work.
Tip: Keep a dedicated, uncluttered space to minimize accidental heat exposure to non-target parts. - 2
Pre-cut and pre-tin tabbing wires
Measure and cut tabbing wires to the required lengths for your string. Lightly tin the ends to improve wetting at the first contact—this reduces the amount of heat needed during final soldering and helps prevent cold joints.
Tip: Pre-tinning helps the solder flow more evenly and speeds up subsequent joints. - 3
Apply flux to contact areas
Coat the contact pads and the end of the tabbing wire with flux to improve wetting and prevent oxidation during heating. Excess flux can be wiped away after soldering to avoid flux residue interfering with encapsulation.
Tip: Only apply a thin, even coat; excessive flux can wick away heat or contaminate adjacent areas. - 4
Position tabbing wire on the cell bus bar
Align the tabbing wire so it sits flat on the bus bar contact. Hold in place with tweezers or a mechanical jig to ensure accurate alignment before applying heat. This stage is critical for consistent current flow and avoiding edge lift.
Tip: Use a jig or guide to maintain consistent alignment across multiple cells. - 5
Tack-solder one end to fix position
Apply a small amount of heat to secure one end of the tabbing wire to the bus bar. Confirm the wire is anchored without warping the cell surface. This creates a stable reference for the rest of the joint.
Tip: Tacking prevents shifting during the remaining soldering and reduces risk of shorting. - 6
Solder the tab to the bus bar with brief heat pulses
Gently apply heat to the solder joint until the wire wets and flows onto the bus bar. Remove heat promptly to minimize thermal stress on the cell edge. Inspect the bond for a smooth, shiny finish with no gaps.
Tip: Keep heat pulses short; prolonged heating can crack cell edges. - 7
Inspect and rework joints if needed
Look for shiny, uniform joints without bridges or cold spots. If a joint looks dull or includes a void, reflow carefully with a fresh flux patch and minimal heat. Clean any flux residue after inspection.
Tip: A broken or dull joint can severely limit panel performance; fix immediately. - 8
Seal edges and perform a basic test
Apply encapsulant at exposed edges to protect against moisture. Use a multimeter to check continuity across the connected cells, ensuring no short circuits. If all looks good, proceed to the next cell or proceed with the next assembly stage.
Tip: Early testing catches issues before full panel assembly.
Quick Answers
What is the safest temperature range for soldering solar cells?
Soldering should be done with controlled heat to prevent damage. Use a low-to-moderate range suitable for electronics soldering and apply heat in short pulses, focusing on the tabbing wire and bus bar rather than the cell face.
Use brief heat pulses and avoid direct, prolonged heat on the cell surface.
Can I solder solar cells without tabbing wires?
Tabbing wires minimize heat transfer to the cell surface and provide a robust current path. Directly soldering to a cell surface risks damage and weak joints.
Tabbing wires are essential for safe, reliable connections.
How do I verify a good solder joint on a solar cell?
Look for a smooth, shiny blob with no gaps or bridges. Use a multimeter to verify continuity and check for unexpected resistance in the string.
Inspect visually and test continuity to confirm reliability.
Is flux always needed for soldering solar cells?
Flux helps prevent oxidation and improves wetting of the metal surfaces, leading to better joints. Rosin-based flux is a common, safe choice for solar-cell work.
Flux helps ensure you get a strong, clean joint.
What encapsulation materials work best after soldering?
Choose encapsulants compatible with your panel design and climate exposure. Edge sealing and proper potting protect against moisture and mechanical stress.
Seal the edges to protect the joints from moisture and vibration.
Watch Video
Top Takeaways
- Plan connections before soldering.
- Use flux and lead-free solder for clean joints.
- Keep heat brief and focused on contacts.
- Inspect joints visually and with a continuity test.
- Seal exposed edges to improve durability.