Easiest Way to Solder: A Practical Beginner Guide
Learn the easiest way to solder with a simple, controlled workflow—flux, proper heat, and small joints. This beginner-friendly guide from SolderInfo covers tools, steps, safety, and troubleshooting for reliable solder joints.

Mastering a clean solder joint starts with the simplest method: use a temperature-controlled iron, flux, and a small-diameter lead-free rosin-core solder. Keep joints brief, tin the tip, and work in a well-ventilated area. This approach minimizes heat damage and cold joints while teaching the fundamentals. Practice on scrap parts to build confidence before working on real boards.
The easiest way to solder: a beginner-friendly workflow
When someone asks for the easiest way to solder, they want a reliable, repeatable method that minimizes mishaps. The core idea is straightforward: control heat, use flux, and keep joints small and clean. This introductory approach is designed for electronics, jewelry, and basic plumbing soldering alike. According to SolderInfo, a steady, low-stress workflow reduces wasted effort and improves consistency across project types. By following a simple prep-then-apply routine, you’ll find that the easiest way to solder becomes second nature after just a few practice sessions. This guide emphasizes practical steps, common-sense safety, and tactile feedback from your soldering iron.
Why a controlled approach matters
Heat control is the single most important factor in achieving reliable joints. Excess heat can damage components, lift pads, or scorch delicate plastics. A controlled, shorter heat pulse ensures the solder wets and forms a solid joint without overheating adjacent parts. Flux plays a crucial role by cleaning metal surfaces and allowing solder to flow smoothly. For beginners, flux also helps bridge tiny contaminant gaps, making joints easier to complete successfully on the first try. The combination of careful heat, flux, and new-hand coordination is what makes this the easiest way to solder for most hobbyists.
Essential tools and materials for reliable results
Starting with the right setup minimizes confusion and frustration. A temperature-controlled iron helps you stay within safe limits, and a small-diameter solder (lead-free rosin-core preferred for safety) supports precision work. A flux pen or flux paste improves wetting, while helping hands or a third-hand tool holds components steady. Keep a damp sponge or brass tip cleaner handy to maintain tip cleanliness. Ventilation is important; always work in a well-ventilated area or use a fume extractor.
The basic workflow: a practical, repeatable sequence
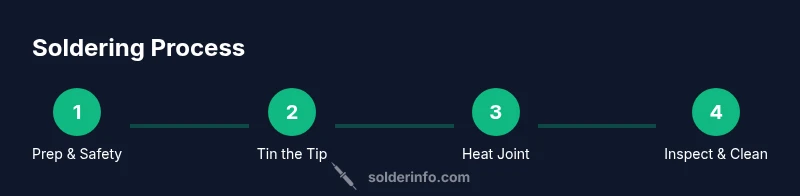
The simplest soldering workflow follows a predictable sequence: prep, tin, apply flux, heat, apply solder, and inspect. Begin by cleaning the surfaces to be joined. Tin the iron tip so it’s ready to transfer heat efficiently. Apply a small amount of flux to the joints to improve flow. Heat the joint, then touch the solder to the joint (not directly to the iron) until a smooth fillet forms. Finally, remove heat and inspect the joint. With practice, this flow becomes natural and minimizes wasted effort.
Common pitfalls and how to avoid them
Cold joints, overheating, and bridging are the most frequent problems for beginners. A cold joint feels dull and may crack when flexed. Overheating can damage components or boards, especially on heat-sensitive plastics. To avoid these issues, use a controlled heat pulse, ensure proper flux application, and keep soldering time brief. If you see a bad joint, reheat and apply a tiny amount of solder while stabilizing the parts. Consistent practice helps you detect and correct these issues quickly.
Finishing touches: cleaning and inspecting
After you complete a joint, wipe away flux residue with isopropyl alcohol and a brush or lint-free wipe. Inspect joints for wetting, fillet shape, and symmetry. A good joint should be shiny and well-formed, with no gaps or excessive solder. If you suspect oxidation on the tip, re-tin it and continue. Proper cleaning also improves long-term reliability and reduces corrosion risk. This finishing discipline is part of the easiest way to solder and helps beginners develop meticulous habits.
Safety and workspace habits to sustain long-term success
Soldering safety includes adequate ventilation, eye protection, and avoiding burns. Keep hot components away from flammable materials and never touch the hot iron with bare skin. Use clamps or helping hands to secure parts, and store unused flux and solder in a cool, dry place. A disciplined setup makes the process smoother and safer, especially when you work on larger or more complex projects. The right environment supports ongoing success when mastering the easiest way to solder.
Applications across electronics, jewelry, and plumbing
While the core technique remains similar, you may adjust flux choice, solder alloy, and heat level for different materials. Electronics soldering emphasizes small joints and clean pads; jewelry soldering prioritizes delicate fittings and artistic finishes; plumbing soldering focuses on pipe joints and leak prevention. The foundational principles—clean surfaces, proper flux, and controlled heat—remain constant and help you transfer skills quickly between disciplines.
Tools & Materials
- Soldering iron (temperature-controlled, with adjustable knob)(Choose a compact iron with a comfortable grip; set to a mid-range temperature suitable for lead-free solder.)
- Lead-free rosin-core solder (small diameter, 0.6–1.0 mm)(Lead-free rosin-core is safer and easier to work with for beginners; smaller diameter gives finer control.)
- Flux pen or flux paste(Flux improves wetting and helps avoid cold joints on difficult substrates.)
- Helping hands or third-hand tool(Keeps components steady and free of movement during heating.)
- Soldering stand and sponge or brass tip cleaner(Prevents tip oxidation and keeps the tip ready for use.)
- Isopropyl alcohol (for cleaning) and lint-free wipes(Used to remove flux residue after soldering; avoid water if possible.)
- Safety glasses(Eye protection is essential when heating metals and flux fumes.)
- Ventilation or fume extractor(Helps remove flux fumes; strongly recommended in enclosed spaces.)
Steps
Estimated time: 15-25 minutes
- 1
Prepare workspace and safety gear
Clear a clean, well-ventilated area. Lay out tools and components. Put on safety glasses and ensure your iron is cool before you begin planning joints.
Tip: Position parts with helping hands to prevent slips during heating. - 2
Tin the iron tip and prep components
Wipe the iron tip on the sponge, then apply a tiny amount of solder to tin the tip. Clean the pads or wires with isopropyl alcohol and ensure they’re dry before continuing.
Tip: Tinning the tip reduces heat transfer resistance and improves heat delivery to the joint. - 3
Apply flux and position the joint
Brush a small amount of flux on the joint surfaces. Place components so their pads align, and hold them steady with the helping hands.
Tip: Flux helps solder flow and reduces the risk of cold joints at the initial contact. - 4
Heat the joint and apply solder
Touch the iron to the joint first to heat it, then touch the solder to the joint (not the iron). Feed just enough solder to form a bright, smooth fillet. Remove heat and allow it to cool undisturbed.
Tip: Stop adding solder once you see a shiny, conical fillet; avoid blobs and bridges. - 5
Inspect, clean, and test
Check for a clean wetting, proper fillet, and no cold joints. Wipe away flux with isopropyl alcohol. If you see dull spots, reheat gently and add a touch more solder.
Tip: Test mechanical strength by gently tugging on wires once cooled.
Quick Answers
What is the easiest way to solder?
The easiest method uses controlled heat, flux, and small joints. Practice on scrap parts to build confidence and develop a repeatable flow.
The easiest way to solder is to keep heat controlled, flux the joints, and practice on scrap pieces until you’re confident.
Do I need to use flux?
Flux improves solder flow and helps prevent cold joints. It’s especially helpful on oxidized or dirty surfaces.
Yes, flux is important for clean, reliable joints.
Is lead-free solder harder to work with?
Lead-free solder is safer and widely used, but it can be less forgiving than leaded solder. Proper flux and controlled heat help.
Lead-free is safer, with a bit more care needed for heat and flux.
I’ve got a cold joint. What should I do?
Reheat the joint gently, clean the surface, apply a small amount of flux, and add a tiny amount of solder to form a proper fillet.
If you get a cold joint, reheat and add a little more solder with flux.
What safety measures are essential?
Work in a ventilated area, wear eye protection, and keep flammable materials away. Use clamps or helping hands to avoid burns.
Ventilate, wear protection, and secure parts to avoid burns.
Can I practice without a board?
Yes. Use spare wire segments and small test pads to perfect your technique before tackling a real board.
Absolutely—practice with scrap wires and pads first.
Watch Video
Top Takeaways
- Control heat to prevent damage and improve joint reliability.
- Flux improves wetting and reduces solder bridges.
- Tin the iron tip for faster, cleaner joints.
- Clean joints thoroughly after soldering.
- Practice on scrap parts to build speed and accuracy.